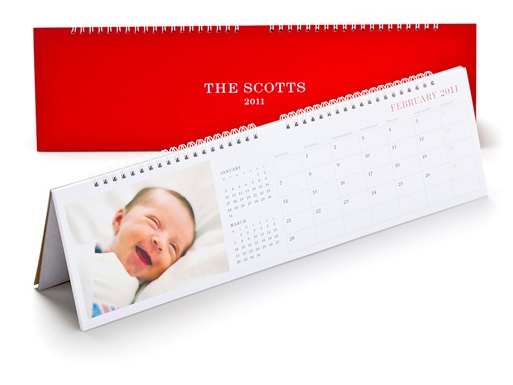
Want the perfect Valentine's Day gift for your wife, mother, sister, or friend (especially ones with children or grandchildren)? How about one of these personalized items from Pinhole Press? You can make journals, recipe books, calendars, day planners, note pads, or just a photo book with your photos. I would love a day planner myself, to keep track of all of those doctor visits, meetings, and brunches that come up and are so easily forgotten (especially with a new baby)!
Showing posts with label personalization. Show all posts
Wednesday, February 9, 2011
Friday, January 21, 2011
Dream: Write a Bike
How cool are these personalized bikes!? Even if they aren't produced yet, the photo makes for great wall art for now...
Go check them out here.
Labels:
fun,
personalization,
whimsy
Friday, October 15, 2010
Lovely Ornaments
Christmastime is just around the corner! I've always loved Christmas ornaments, but now that I'm married and will have a baby by then, I'm always looking for sweet personalized ornaments to collect over the years. Leave it to Paloma's Nest to have something I, and you, will love!
What a great gift these would make for a newly married couple or new parents!
Labels:
gifts,
holiday,
paloma's nest,
personalization
Friday, April 9, 2010
Alphabet Details
There is something so simple yet so personal about incorporating your initials into your wedding day. You can use them as your personal wedding "brand" by incorporating your initials into your invitation monogram, paper goods, and decor, or simply hang your initials from a nearby tree or in your DIY photo booth (which is what I did). I bought craft letters from Paper Source, spray painted them, and hung them with ribbon that matched the ribbon on our programs and other elements. You can cover them in fabric, flowers, or whatever you can think of. Anthropologie has metal and fabric letters if you don't want to DIY and don't mind spending some money.
Labels:
California wedding,
decor,
details,
florals,
initials,
letters,
personalization
Wednesday, April 7, 2010
Etsy Favorites {#2}
Time for another round of Etsy favorites, and this time they are all wedding items!
First up, this unique and personal fingerprint wedding band from fabuluster:
And for $195, it is a pretty affordable wedding band!
I love personalized cake toppers, and I love cupcakes in lieu of a traditional wedding cake. So how adorable are these cupcake toppers from goosegrease!?
And they are customizable.
These personalized buttons are so fun and could be cool attached to the guests' escort cards, from repchi:
These chalkboard thought bubbles would be perfect for your DIY photobooth!
From dzns4ubyme
These papercut banners would be great for a shower, rehearsal dinner, or backyard wedding, and they can also be personalized with your names and wedding colors:
By aymujer
Labels:
cake topper,
Etsy,
personalization,
wedding,
wedding band
Thursday, April 1, 2010
DIY Photo Booth / Polaroid Station
One of my wedding musts was a photo booth. My husband and I started dating in high school and we have a collection of photo booth strips from over the years (we even did some during our engagement photos). But we didn't have $1500+ extra in our budget to rent one, so I decided to make one myself. I've seen them DIY photo booths different ways, depending on the kind you want and the amount of work you want to put in. I wanted to put in very little work, as I already had lots of DIY projects I was doing myself. So, here are my super simple instructions for a DIY photo booth/ polaroid station:
1. First, find a bright, fun fabric to use as the background. I went to Joann's Fabrics and bought mine on sale. I got extra and used it for the fabric tiers of my cupcake tower. I would suggest 6 yards to be sure you have enough. I also like this lace background from Martha Stewart Weddings.
2. Depending on where you are going to have the 'booth' you may need some supportive structure. I hung mine from shrubbery, so we basically just tied the fabric corners to the sticks of the shrubs. If you do not have a structure to use, you'll need to build one, but most any venue would have a wall that you can tie, stick, or fasten your fabric to.
3. You'll need a digital camera and a quality photo printer, or even better and easier, a Polaroid camera and film. I found both of mine on ebay. The film has sadly been discontinued, so it isn't the cheapest, but $200 on film vs. $1500+ to rent a booth still equals a bargain in my book.
4. Make a sign (I used a chalkboard one) instructing guests on how you want them to take photos and what to do with them (are they favors, do you want to keep them, are they for the guestbook, etc.)
5. You can gather props if you want as well, or again, you can use a chalkboard so guests can write messages and put them in the photos. I didn't use props, but I did hang our initials on the backdrop (which were craft paper initials from paper source that I painted and tied ribbon to).
6. Put a small table near the fabric backdrop. This is where you'll put your camera, film, sign, props, etc.
{UPDATE: If you need a structure, see this post that went up today at Ruffled Blog. It is a great and cheap way to build a photobooth structure!}
After these very simple steps, you have your own DIY photo booth. My guests absolutely loved ours, and we didn't even tell them what to do with the photos (one of the things I forgot in the rush, along with getting a polaroid of just myself and my husband together) but they gave the photos to us, which I loved! I'm going to frame them all in a huge framed collage and hang them in our apartment (someday!) Here are a few of our polaroids from our DIY booth:
1. First, find a bright, fun fabric to use as the background. I went to Joann's Fabrics and bought mine on sale. I got extra and used it for the fabric tiers of my cupcake tower. I would suggest 6 yards to be sure you have enough. I also like this lace background from Martha Stewart Weddings.
2. Depending on where you are going to have the 'booth' you may need some supportive structure. I hung mine from shrubbery, so we basically just tied the fabric corners to the sticks of the shrubs. If you do not have a structure to use, you'll need to build one, but most any venue would have a wall that you can tie, stick, or fasten your fabric to.
3. You'll need a digital camera and a quality photo printer, or even better and easier, a Polaroid camera and film. I found both of mine on ebay. The film has sadly been discontinued, so it isn't the cheapest, but $200 on film vs. $1500+ to rent a booth still equals a bargain in my book.
4. Make a sign (I used a chalkboard one) instructing guests on how you want them to take photos and what to do with them (are they favors, do you want to keep them, are they for the guestbook, etc.)
5. You can gather props if you want as well, or again, you can use a chalkboard so guests can write messages and put them in the photos. I didn't use props, but I did hang our initials on the backdrop (which were craft paper initials from paper source that I painted and tied ribbon to).
6. Put a small table near the fabric backdrop. This is where you'll put your camera, film, sign, props, etc.
{UPDATE: If you need a structure, see this post that went up today at Ruffled Blog. It is a great and cheap way to build a photobooth structure!}
After these very simple steps, you have your own DIY photo booth. My guests absolutely loved ours, and we didn't even tell them what to do with the photos (one of the things I forgot in the rush, along with getting a polaroid of just myself and my husband together) but they gave the photos to us, which I loved! I'm going to frame them all in a huge framed collage and hang them in our apartment (someday!) Here are a few of our polaroids from our DIY booth:
And my favorite one, of my brother and my mom:
And we have 40+ more of these . . . how awesome were my wedding guests!?
Labels:
DIY,
personalization,
photo booth,
wedding
Tuesday, March 23, 2010
It's in the Details: Chalkboards, plus a DIY project!
I love the DIY feel and laid back vibe of chalkboards in weddings. You can use them for so many different things, and can "dress them up" or keep them low key. Here are some of my favorite uses:
To display seating assignments, in lieu of escort cards:
Left: Sarah Yates Photography, Right: Harper Smith Photography
As Escort Cards:
Drink or Signature Cocktail Menu:
Left: Jenny Ebert, Right: Jennifer Roper Photography
For messages for your photo booth guestbook:
Top: Jen Fariello, Bottom: Nichols Photography
To explain your photo booth:
For Menus or games:
Top: Sarah K. Chen, Bottom: Via Once Wed
For Various Wedding Signage:
Left: W. Scott Chester Photography, Right: Heather Kincaid
Bride and Groom signage (for photos, thank you cards, etc.):
Top: Shannon Nicole Smith, Right: By Sarah Maren via 100 Layer Cake
To explain a tribute to a loved one (and I love this tribute idea):
As table numbers:
Via Snippet & Ink
The table number above is also a great DIY project. Find candle holders that have a smooth surface. Paint them with chalkboard paint (available at any craft store). Once the paint dries, you can write the table number in chalk. Put in a candle, and voila, DIY candle holders / table numbers. LOVE this idea!
What are your favorite chalkboard uses?
Labels:
budget friendly,
candles,
chalkboards,
details,
DIY,
escort cards,
menus,
personalization,
photo booth,
shabby chic,
signs,
table numbers,
vintage,
wedding
Wednesday, March 3, 2010
Something Blue
There are so many personal and meaningful ways to do the "Something Old, Something New" tradition in your wedding. But I have to admit that my favorite is "something blue," which is why I had five somethings blue!
Photos by Jennifer Roper
The hanky was vintage and given to me by my mother. She clipped special momentos to it to represent my loved ones who weren't at my wedding but with me in spirit (my father's wedding band, and something that belonged to my grandmother and grandfather) and I wrapped it around my bouquet.
The keys were wedding presents. The larger key and necklace were my wedding day gift from my husband, and the smaller key was a gift from my brother...and it was a total coincidence that they both happened to give me keys (and I wear them together every day!). From Tiffany & Co.
The garter was made by Julianne Smith, otherwise known as Garter Girl who makes classy and beautiful garters. I loved it, and even though I didn't do a garter toss, I think it was fun to know I was wearing one and to have as a keepsake for later.
The dress label was one of my favorite touches. It had my name with both my maiden name and my new last name and wedding date, and I had my tailor sew it into my dress under my Melissa Sweet dress label. It was made for me by etsy seller Dana Marie Creations.
The thong is light blue and is from Hanky Panky, and are the most comfy thongs ever!
What were/are your somethings blue?
Labels:
Accessories,
dress label,
gifts,
hankies,
heirlooms,
keepsake,
personalization,
vintage,
wedding
Monday, February 22, 2010
Allow me to introduce . . . Tilde Designs!
What happens when two girls meet in law school, cram for countless exams, study for the bar exam, and become attorneys? Practice law, you might say. . . and you would probably be correct in most cases. But in the case of my best friend Kate and I, we also decided we wanted to channel our creative talents and skills (those acquired in our own wedding planning, NOT in law school) to start a wedding/event design and paper goods business.
Kate is an amazing paper goods designer. She started dabbling in it for her own wedding and did everything but the calligraphy for my wedding (and did a fantastic job, I might add). We had the best time collaborating over Save-the-Dates and invitations, menus, cupcake flags, and various other wedding signage. Those elements we designed together were what made my wedding cohesive, thoughtful, and full of personal touches.
Kate and I thought it might be fun to put our design brains together and launch a little business. Not to be deterred by distance (she lives in Chicago and I in L.A.), or day jobs (we both still have them), we formed a plan. Over our bliss cakes and coffee brunch at M. Henry last fall, we made the decision to devote 2010 to launch our new baby . . . Tilde Designs. Less than two months in, we have an etsy shop and this blog, and several new clients already. We couldn't be more excited about what the future holds!
So please stop by our etsy shop for paper goods, a customized monogram, or an inspiration board designed for your event. Check back often for new items or request any customized item you want. If someone you know is getting married, throwing a wedding or baby shower, in need of personalized cards, having a baby, or just likes pretty paper goods, please send them our way!
xx
Kate & Chandra
Kate is an amazing paper goods designer. She started dabbling in it for her own wedding and did everything but the calligraphy for my wedding (and did a fantastic job, I might add). We had the best time collaborating over Save-the-Dates and invitations, menus, cupcake flags, and various other wedding signage. Those elements we designed together were what made my wedding cohesive, thoughtful, and full of personal touches.
Kate and I thought it might be fun to put our design brains together and launch a little business. Not to be deterred by distance (she lives in Chicago and I in L.A.), or day jobs (we both still have them), we formed a plan. Over our bliss cakes and coffee brunch at M. Henry last fall, we made the decision to devote 2010 to launch our new baby . . . Tilde Designs. Less than two months in, we have an etsy shop and this blog, and several new clients already. We couldn't be more excited about what the future holds!
So please stop by our etsy shop for paper goods, a customized monogram, or an inspiration board designed for your event. Check back often for new items or request any customized item you want. If someone you know is getting married, throwing a wedding or baby shower, in need of personalized cards, having a baby, or just likes pretty paper goods, please send them our way!
xx
Kate & Chandra
Labels:
details,
Etsy,
inspiration boards,
invitations,
menus,
paper goods,
personalization,
programs,
Save the Dates,
stationery,
wedding
Friday, February 19, 2010
Let them eat...cupcakes!
I know, I know, cupcakes in lieu of cake is no longer a revolutionary concept. But, I still think it is a fantastic idea and fun way to show personality, especially if you LOVE cupcakes like I LOVE cupcakes!
My husband and I had a cupcake tower instead of a cake. We had a favorite bakery for a couple of years (big shout out to Vanilla Bakeshop!) and we were lucky enough to get to have that bakery do our cupcake tower and for our venue to waive our cake cutting fee and allow it. Our guests went nuts over those cupcakes. Plus we picked our favorite flavors and it was easier to feed to each other during our "cake cutting." And it allowed us to make adorable signs that told guests what flavor of cupcakes were on which level and cute little flags with our monogram on them.
So for all of you brides out there who are considering cupcakes instead of a traditional cake, I say go for it. They make for yummy treats and great pictures!
My husband and I had a cupcake tower instead of a cake. We had a favorite bakery for a couple of years (big shout out to Vanilla Bakeshop!) and we were lucky enough to get to have that bakery do our cupcake tower and for our venue to waive our cake cutting fee and allow it. Our guests went nuts over those cupcakes. Plus we picked our favorite flavors and it was easier to feed to each other during our "cake cutting." And it allowed us to make adorable signs that told guests what flavor of cupcakes were on which level and cute little flags with our monogram on them.
So for all of you brides out there who are considering cupcakes instead of a traditional cake, I say go for it. They make for yummy treats and great pictures!
Cupcakes and tower design by Vanilla Bakeshop, Signs and flags by Tilde Designs, bird cake toppers by Cotton Bird Designs, and photos by Jennifer Roper
Labels:
cake,
cake topper,
cupcakes,
desserts,
details,
Etsy,
paper goods,
personalization,
vanilla bake shop,
wedding
Thursday, February 18, 2010
It's in the Details: Vintage Keys
I like to tell myself I started the trend of antique keys that I'm starting to see on paper goods, in weddings, and even at Tiffany & Co. While I know deep down that isn't true (obviously) I did think of the idea to use vintage keys in my wedding before I had ever seen anyone else using them, and my mother and I hunted for about 16 months for them. We scoured flea markets, antique shops, estate sales, any place we could think of to find a key for each guest that would attend my wedding. And they were a big hit. Now, everyone that attended my wedding has a little piece of it at home with them, as my husband and I do, and I love that. Here are some ways we used the keys in our own wedding:
Tied to our escort cards
Tied to our florals
In our ring photos
All photos by Jennifer Roper, Florals by Greenwich Floral Design, Calligraphy by Barbara Kua
Labels:
calligraphy,
centerpieces,
decor,
details,
DIY,
escort cards,
favors,
florals,
keys,
personalization,
vintage,
wedding
Wednesday, February 17, 2010
Personalize your day
I say it a lot, and it is basically the whole point of my starting this blog, but I think the best way to make your wedding special is to make it personal. Don't choose the the cliche' song to dance to during your first dance and don't say the traditional vows if they don't feel special to you. You can personalize your ceremony, your invitation suite, your favors, the music you play...basically everything you can think of. That is not to say you should personalize every single element of your day, because that can be overwhelming and overkill. But if you start simple with a basic idea or element that you like, and find ways to include that idea in different aspects of your day, that is personalizing. And if you can throw some DIY projects in along the way, even better!
One way to personalize different aspects of your wedding cohesively is to use the same element in different places or ways. A good way of doing that is through a monogram. Here are examples of how to use the same monogram on different items to basically create a personalized "brand" for your wedding. You start with the monogram itself:
And you use it on Save the Dates:
Incorporate it into ceremony details like your programs:
And also into reception elements like cupcake flags and drink stirs:
You can even incorporate the monogram on things like out-of-town bags:
Program, cupcake, and drink photos taken by Jennifer Roper and products designed by Tilde Designs.
Labels:
cupcakes,
details,
DIY,
monograms,
personalization,
programs,
stationery,
wedding
Subscribe to:
Posts (Atom)


